![]()


![]()
![]()
|
|
|
|
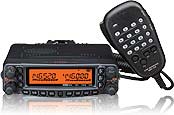
Here is how I installed a Yaesu FT8800 Dual Band Amateur Radio Transceiver in my 2006 GMC Envoy.
Starting with the antenna, (click for picture) I mounted a standard NMO roof mount antenna connector into a sheet metal bracket. Normally the bottom of a mount of this type is not waterproof. I solved this by coating the bottom of the mount with J-B Weld. After it cured, I covered the top portion of the mount with tape, and painted the whole assembly satin black. Once the paint dried, I mounted this bracket to a screw that holds the roof rack to the roof. I removed the rearmost screw on the left side, and slipped the bracket in between the U channel and the roof, and re-installed the screw securing the antenna bracket. I then installed the Comet B-10NMO antenna. I chose this antenna because it is only 12 inches tall and does not strike my garage door when I enter the garage.
The cable was routed into the vehicle with a drip loop (click for picture), and then routed to the radio installed in the under floor compartment in the rear of the vehicle (click for picture - click for reality - click for in-service picture). As you can see in the pictures, I used existing holes in the carpeting to route antenna, power, control head and speaker cables under the carpting. Power is supplied from the fuse box under the back seat, and control head and speaker cables are extended all the way to the dashboard. I used a stereo extension cable instead of the mono cable supplied with the remote mounting kit just in case I decide to run separate speakers for each 'side' of the radio in the future.
The control head was initially mounted under the center of the dashboard with Velcro (click for picture 1 and picture 2) . This did not work very well, so I tried using a piece of wood cut at a 45 degree angle and Velcro, and this did not work either. I finally used a sponge cut to the shape of the forward cutout in the console, and this has been holding the radio in place nicely for quite some time. Speakers are tucked in next to the console, under the front edge of the seats. The easiest part of this installation was the microphone hanger. It is an old universal cell phone hanger and is attached to the dashboard with foam tape.
This is a (nearly) professional looking install that works very well. I only with I would have permanently mounted the antenna sooner. I was using a magnetic mount for quite some time; not only was it kind of ugly, but it caused some paint and trim damage to the roof as well.
73 de n0kfb
v20090338 drm